1. Overview
1.1 What is KubeVPN?
KubeVPN is a tool that provides seamless network connectivity between a Kubernetes cluster and your local environment. It differs from the traditional port forwarding approach in the following ways.
| Method | Description |
|---|---|
| Port Forwarding | Forwards a specific port to your local machine to access a single service, but becomes inconvenient when multiple ports or complex network configurations are required |
| KubeVPN | Extends the entire network as if it were inside the cluster, allowing direct use of Pod IPs and native DNS |
1.2 KubeVPN's Technical Architecture
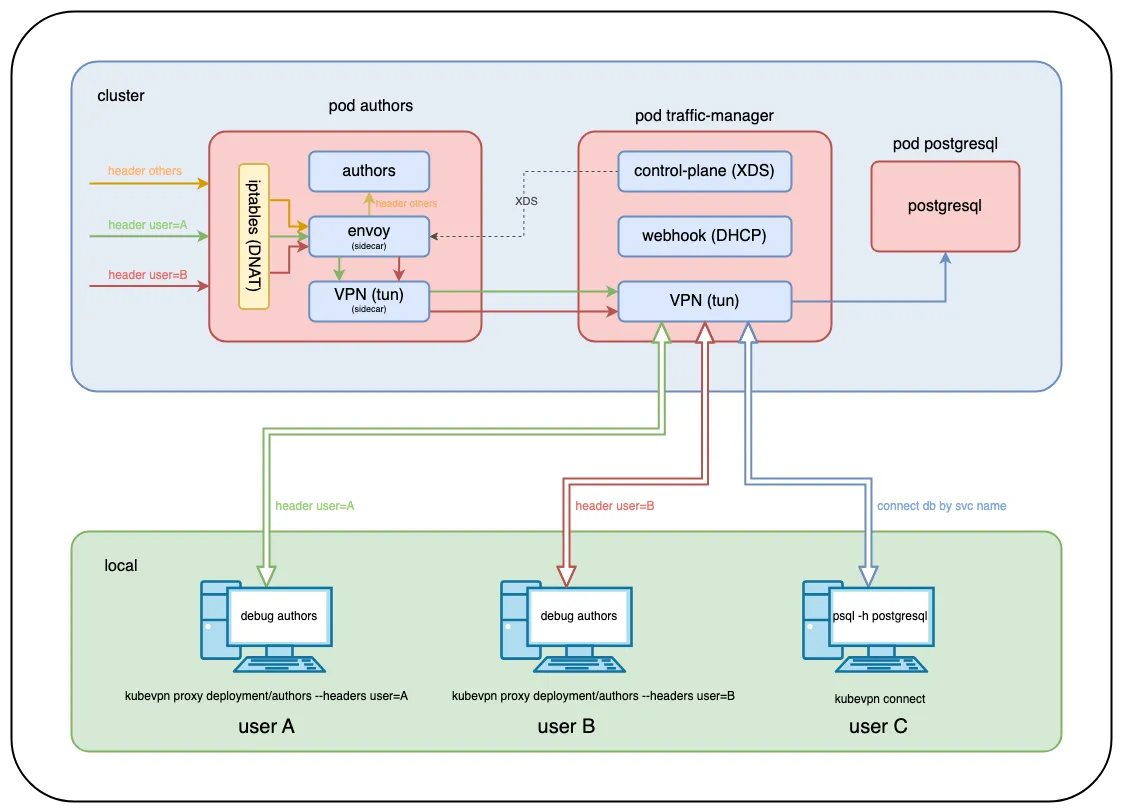
KubeVPN's architecture connects the cluster's internal network and your local environment through a VPN tunnel, enabling seamless communication. The main components are as follows.
- Proxy Pod: Handles network tunneling inside the cluster
- VPN Client: Configured so the local machine can access the cluster network
- Traffic Routing: Redirects traffic to the local environment based on conditions such as HTTP headers
1.3 Key Features of KubeVPN
- Direct Cluster Networking
- Direct communication via Pod IP addresses: enables Pod-to-Pod network communication as if inside the cluster
- Native Kubernetes DNS Resolution: lets you use the DNS provided by the cluster as-is
- Route Traffic from Cluster to Local Machine
- Can redirect traffic to the local environment based on HTTP request header conditions
- Supports network connectivity between the local environment and the cluster for smooth debugging and development
- Multi-Cluster Connection Support
- Connect multiple
Kubernetesclusters simultaneously to build a unified network environment
2. How to Use KubeVPN
To try out
KubeVPN, run a k8s cluster locally with Minikube. Reference: Easily Building a Local Kubernetes Cluster on Mac with Minikube
Deploy a sample application for testing.
> kubectl apply -f https://raw.githubusercontent.com/kubenetworks/kubevpn/master/samples/bookinfo.yaml
2.1 Installing KubeVPN
You can easily install it using Homebrew.
> brew install kubevpn
Check the version to confirm it installed correctly.
> kubevpn version
KubeVPN: CLI
    Version: v2.3.13
    Daemon: unknown
    Image: docker.io/naison/kubevpn:v2.3.13
    Branch: master
    Git commit: brew
    Built time: 2025-02-23 13:42:21
    Built OS/Arch: darwin/arm64
    Built Go version: go1.24.0
💡 Tip: Setting up an alias. If the
KubeVPNcommand feels too long, setting up analiasas shown below is convenient.
> echo 'alias kv="kubevpn"' >> ~/.zshrc
> source ~/.zshrc
> kv version
2.2 Connecting to a Kubernetes Cluster with KubeVPN
To connect to a k8s cluster, run the following command.
> kubevpn connect
Starting connect
Getting network CIDR from cluster info...
Getting network CIDR from CNI...
Getting network CIDR from services...
Labeling Namespace default
Creating ServiceAccount kubevpn-traffic-manager
Creating Roles kubevpn-traffic-manager
Creating RoleBinding kubevpn-traffic-manager
Creating Service kubevpn-traffic-manager
Creating MutatingWebhookConfiguration kubevpn-traffic-manager
Creating Deployment kubevpn-traffic-manager

Pod kubevpn-traffic-manager-75dc49c46f-bpr5b is Pending...
Container     Reason            Message
control-plane ContainerCreating
vpn           ContainerCreating
webhook       ContainerCreating

Pod kubevpn-traffic-manager-75dc49c46f-bpr5b is Running...
Container     Reason           Message
control-plane ContainerRunning
vpn           ContainerRunning
webhook       ContainerRunning

Forwarding port...
Connected tunnel
Adding route...
Configuring DNS service...
Configured DNS service
+----------------------------------------------------------+
| Now you can access resources in the kubernetes cluster ! |
+----------------------------------------------------------+
Check the connection status with kubevpn status.
> kubevpn status
ID    Mode   Cluster    Kubeconfig                 Namespace   Status      Netif
0     full   minikube   /Users/user/.kube/config   default     Connected   utun7
2.3 Testing Network Status
Check the Pod's IP address and verify the network status with ping.
> kubectl get pod -o wide
NAME                                       READY   STATUS    RESTARTS   AGE     IP           NODE       NOMINATED NODE   READINESS GATES
authors-54bf85cb9c-qcfww                   2/2     Running   0          2m10s   10.244.0.7   minikube   <none>           <none>
details-7ff4648765-b575k                   1/1     Running   0          2m10s   10.244.0.3   minikube   <none>           <none>
kubevpn-traffic-manager-75dc49c46f-8svpd   3/3     Running   0          19s     10.244.0.9   minikube   <none>           <none>
productpage-84bb8d95cc-clvst               1/1     Running   0          2m10s   10.244.0.6   minikube   <none>           <none>
ratings-dbb78b449-tnzzl                    1/1     Running   0          2m10s   10.244.0.4   minikube   <none>           <none>
reviews-56bf74fbdc-8g5q8                   1/1     Running   0          2m10s   10.244.0.5   minikube   <none>           <none>

> ping 10.244.0.3
PING 10.244.0.3 (10.244.0.3): 56 data bytes
64 bytes from 10.244.0.3: icmp_seq=0 ttl=63 time=4.274 ms
64 bytes from 10.244.0.3: icmp_seq=1 ttl=63 time=9.553 ms
If you cannot reach service IP addresses, you need to connect with the --netstack gvisor option. When the k8s cluster's kube-proxy is using ipvs mode, access via service IP may fail, so connecting with the above option to use gVisor resolves the issue.
> kubevpn connect --netstack gvisor
Reference
3. Conclusion
Connecting to multiple pods previously required port forwarding every time, but with KubeVPN you can access all pods in the cluster, making development and debugging much smoother.