1. Introduction
Back when I worked with Linux servers a lot, I couldn't imagine getting things done without tmux. Then I moved to mostly local development and forgot about it for a while, but lately, using terminal-based AI coding tools like Claude Code, I've started reaching for it again. So I figured I'd take this chance to lay out tmux from scratch, from a beginner's perspective.
If any of these sound familiar, tmux might be the answer.
- You have 10 terminal tabs open and have no idea what's where
- Your SSH connection dropped while working on a remote server, and the build or script that was running got wiped out entirely
- You want to see code editing and logs on one screen, but you keep switching back and forth between windows
This guide covers installation on macOS, walks through the concepts, basic usage, and a minimal config in order, and finishes by introducing how to use it alongside a Claude Code Session. You can just follow along from top to bottom.
2. What is tmux?
tmux is short for terminal mux(multiplexer), i.e. "terminal multiplexer." It's a tool that lets you handle multiple workspaces within a single terminal window and keep those workspaces running in the background.
There are two core values a beginner should remember.
① Session persistence — A tmux Session stays alive in the background even if you close the terminal window or your SSH connection drops. Later, all you have to do is attach again, and your work picks up as if it was never interrupted. The "SSH dropped and my build got wiped out" problem I mentioned earlier disappears right here.
② Screen splitting — You can divide a single screen into multiple Windows and Panes to view several tasks at once. You can keep an editor, logs, and a dev server all in view while you work.
To sum it up in one line, tmux is a workspace that doesn't disappear when you close it and that you can freely divide with partitions.
3. Installation (macOS)
On macOS, it's a one-liner with Homebrew.
brew install tmux
Once installation finishes, check the version.
tmux -V
# tmux 3.5a  (example)
If a version string is printed, you're ready to go. Now, type tmux in your terminal and your first Session begins.
4. Core Concepts: Session, Window, Pane
To use tmux, you need to know three units. They form a containment hierarchy in the order Session > Window > Pane.
- Session: The top-level workspace unit in tmux. Typically you use one Session per project or task. The detach/attach mentioned earlier targets exactly this Session
- Window: Think of it as a "tab" inside a Session. It takes up the whole screen, and you switch between multiple Windows
- Pane: A split screen within a Window. Multiple Panes are visible at once inside a single Window
To put it together, a single Session contains several Windows, and a single Window contains several Panes. By analogy with a browser, a Window is like a "tab," and a Pane is like a "split screen" that divides one tab left/right or top/bottom.
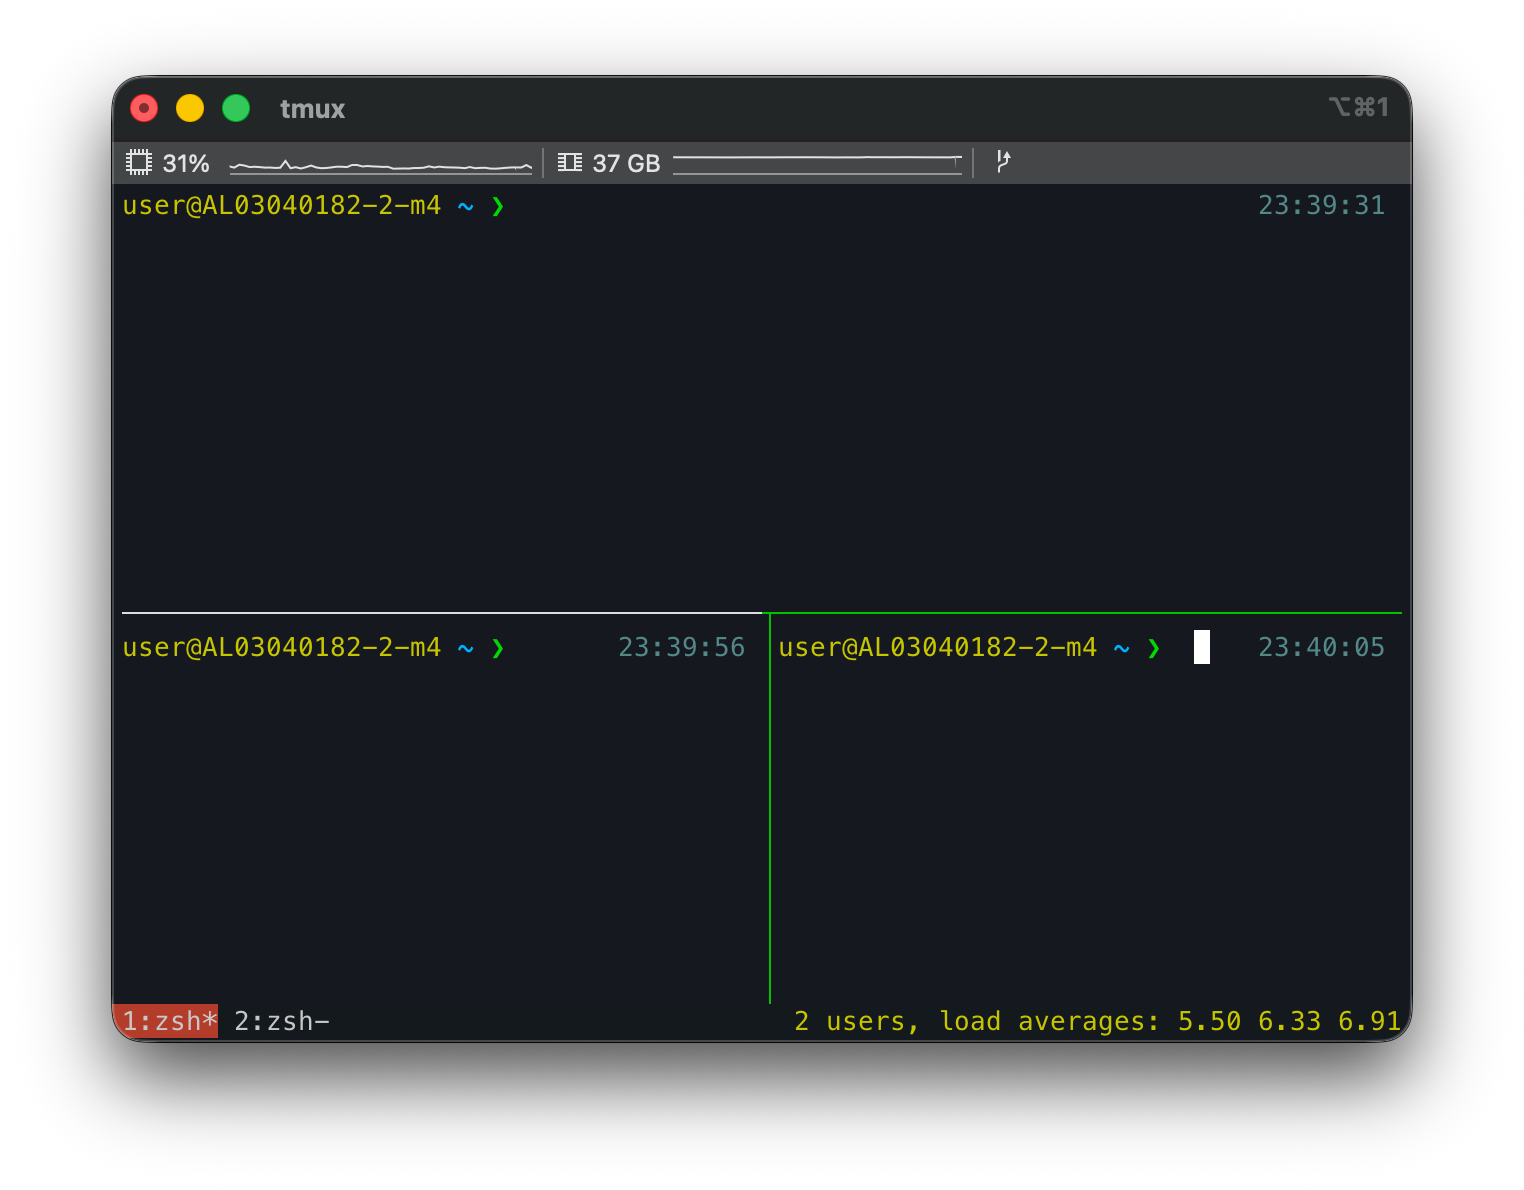
In practice, if you split one Window into three Panes, it looks like the image below. One Pane on top and two Panes on the bottom are all visible on one screen at once, and the bottom line is the status bar that shows the Window list and status.
5. Basic Usage
Almost every tmux shortcut works by pressing Ctrl+b first and then pressing the next key. This Ctrl+b is called the prefix key. For example, Ctrl+b c means "press Ctrl+b, release it, then press c." Just remember that you press them in sequence, not at the same time. (This prefix key can be changed to another key, which is covered in Section 6.)
5.1 Session
A Session is the unit that holds the entire workspace. Typically you create one Session per project, detach when you're done to step out, and attach again later to continue. The three you'll use most often are these.
- Start a new Session (with a name):
tmux new -s my-project - Step out of a Session (detach):
Ctrl+b d(the Session stays alive) - Attach to a Session again:
tmux attach -t my-project
Even after you detach, the work inside the Session keeps running in the background. This detach/attach is the heart of tmux. The rest of the Session-related commands are as follows.
| Action | Command / Shortcut |
|---|---|
| Start a new Session | tmux new -s name |
| detach (step out) | Ctrl+b d |
| attach (re-attach) | tmux attach -t name |
| Attach to the most recent Session | tmux a |
| View the Session list | tmux ls |
| Pick and switch from the Session list | Ctrl+b s |
| Rename a Session | Ctrl+b $ |
| Kill a Session | tmux kill-session -t name |
5.2 Window
A Window is a "tab" inside a Session. If you split Windows by the nature of the task (e.g. one for editing, one for the server), it's convenient to switch between them. The ones you'll use most are creating a new Window and moving between them.
- New Window:
Ctrl+b c - Next / previous Window:
Ctrl+b n/Ctrl+b p - Jump by number:
Ctrl+b 0~Ctrl+b 9
The rest of the Window-related shortcuts are as follows.
| Action | Shortcut |
|---|---|
| New Window | Ctrl+b c |
| Next / previous Window | Ctrl+b n / Ctrl+b p |
| Jump by number | Ctrl+b 0 ~ Ctrl+b 9 |
| Toggle to the last viewed Window | Ctrl+b l |
| Pick and move from the Window list | Ctrl+b w |
| Rename a Window | Ctrl+b , |
| Close the current Window | Ctrl+b & (confirm with y) |
5.3 Pane
A Pane is a split screen that divides a Window left/right or top/bottom. You use it when you want to see code, logs, and server output at the same time on one screen. The ones you'll use most are splitting and moving.
- Split left/right:
Ctrl+b % - Split top/bottom:
Ctrl+b " - Move between Panes:
Ctrl+b arrow key
The rest of the Pane-related shortcuts are as follows.
| Action | Shortcut |
|---|---|
| Split left/right | Ctrl+b % |
| Split top/bottom | Ctrl+b " |
| Move between Panes | Ctrl+b arrow key |
| Cycle to the next Pane | Ctrl+b o |
| Resize a Pane | Ctrl+b Ctrl+arrow key |
| Toggle fullscreen for the current Pane (zoom) | Ctrl+b z |
| Show Pane numbers, then select | Ctrl+b q |
| Break the current Pane into a new Window | Ctrl+b ! |
| Close the current Pane | Ctrl+b x (confirm with y) |
6. Minimal .tmux.conf Config
There's no need to deck it out lavishly from the start. Let's put just four things that make a big difference for beginners into ~/.tmux.conf.
# 1) Change prefix to Ctrl+a (if Ctrl+b doesn't feel right)
unbind C-b
set -g prefix C-a
bind C-a send-prefix

# 2) Enable mouse for Pane selection/resizing/scrolling
set -g mouse on

# 3) Make split shortcuts intuitive ( | left/right, - top/bottom )
bind | split-window -h
bind - split-window -v

# 4) Config reload shortcut (prefix r)
bind r source-file ~/.tmux.conf \; display "Reloaded!"
After saving, to apply it, press Ctrl+b r inside tmux. There's also the option of restarting with tmux kill-server, but be careful—this terminates every running Session. Usually the Ctrl+b r reload is enough.
For reference, changing the prefix to Ctrl+a in setting #1 is purely a matter of taste, an optional choice. Changing it makes it differ from the default prefix, which can be confusing. Just remember that all the shortcuts used in the rest of this article are based on the default prefix Ctrl+b.
7. Using It with Claude Code
That covers the tmux fundamentals. Now let's come back to what I mentioned at the start—the reason I started using tmux often again. Claude Code and tmux pair quite well. There are two reasons.
- Long autonomous work survives via detach. If you hand Claude Code a long task and step out with
Ctrl+b d, the work keeps running even after you close the terminal - You can work in parallel on one screen. Splitting Claude Code, the dev server, and logs into Panes and viewing them at once keeps your workflow from breaking
7.1 Creating and Naming a Session per Folder
When you move between several projects using Claude Code, it's convenient to keep one tmux Session running per project (folder). On top of that, if you use multiple machines (laptop, desktop, mini PC, etc.), Session names can collide, so naming them with the <machine>-<folder> rule keeps things from getting confusing no matter where you attach. For example, if you open the blog folder on your desktop (m4), the Session name becomes m4-blog.
Going one step further, it's nice to pass the same name along when you launch Claude Code in each Session. -n <name> gives the Claude session a name and shows it in the prompt, the resume picker, and the terminal title, while --remote-control <name> turns on remote control under that name. Even if you attach from your phone or another PC, "which task this is right now" is clear from the name alone.
Below is a simplified version of the script I use. You just need to change WORKSPACES (the folder list) and VALID_MACHINES (machine names) to match your own environment.
#!/usr/bin/env bash
set -euo pipefail

# ===== Config (edit to match your own environment) =====
WORKSPACES=(blog inspireme markora)   # Folder names under ~/src
VALID_MACHINES=(m1 m4 mini)           # Machine names (laptop/desktop, etc.)
SRC_DIR="${SRC_DIR:-$HOME/src}"
CLAUDE_CMD="${CLAUDE_CMD:-claude}"

# Session name rule: <machine>-<folder>  (replace . : in the folder with -)
session_name() { echo "$1-${2//[.:]/-}"; }

# Command to run in the Session: give Claude a name (-n) and a remote-control name (--remote-control)
launch_cmd() { echo "$CLAUDE_CMD -n $1 --remote-control $1"; }

create_one() { # <machine> <directory> <folder>
  local session; session="$(session_name "$1" "$3")"
  if tmux has-session -t "$session" 2>/dev/null; then
    echo "Already exists, skipping -> $session"
    return 0
  fi
  tmux new-session -d -s "$session" -c "$2" "$(launch_cmd "$session")"
  echo "Created -> $session ($2)"
}

# Usage: claude_tmux_sessions.sh <machine> [<folder>]
#   If the folder is omitted, all of WORKSPACES; if specified, just that one folder
machine="${1:?A machine name is required (e.g. m4)}"
folder="${2:-}"

if [[ -n "$folder" ]]; then
  create_one "$machine" "$SRC_DIR/$folder" "$folder"
else
  for f in "${WORKSPACES[@]}"; do
    [[ -d "$SRC_DIR/$f" ]] && create_one "$machine" "$SRC_DIR/$f" "$f"
  done
fi

echo "----- Current tmux sessions -----"
tmux ls
echo "Connect: tmux attach -t <session-name>"
Using it is simple.
- Launch all defined folders at once:
claude_tmux_sessions.sh m4 - Launch just one specific folder:
claude_tmux_sessions.sh m4 blog
Then Sessions like m4-blog and m4-inspireme are created per folder, and Claude Code is running under the same name inside each Session. From anywhere, you can attach with tmux attach -t m4-blog and continue working. If you leave it detached, the work keeps running even if you close your laptop or your SSH drops, so you can leave it running on a remote server and continue the same task while moving between home, the office, and your phone. (The actual script also includes a feature to clean up the Sessions you created all at once with --kill.)
Note: Appending
--dangerously-skip-permissionstoCLAUDE_CMDlets you skip the permission prompt every time, but since the tool then runs commands without confirmation, use it only in a trusted environment. Also, options like-nand--remote-controlmay differ depending on your Claude Code version, so check withclaude --help.
Caution: If you open the same repo in multiple Sessions at once and Claude edits the same file simultaneously, conflicts can occur. For parallel work, it's safer to split by folder or separate them with
git worktree.
8. Wrapping Up
The real value of tmux can be summed up in one line: a workspace that doesn't disappear when you close it. Screen splitting is handy too, but in the end the biggest change is escaping the state of "not being able to close the terminal for fear of losing my work."
You don't need to memorize every shortcut from the start. You can start by getting these five into your hands.
- New Session:
tmux new -s name - Step out:
Ctrl+b d - Re-attach:
tmux attach -t name - New Window:
Ctrl+b c - Split left/right:
Ctrl+b %
In particular, I recommend getting comfortable with Ctrl+b d (detach) and tmux attach (re-attach) first. Once just these two are in your hands, the way you approach the terminal changes. After that, layer it on top of long-running work like Claude Code, and you'll quickly feel why you find yourself reaching for tmux again.